Physical Address
304 North Cardinal St.
Dorchester Center, MA 02124
Physical Address
304 North Cardinal St.
Dorchester Center, MA 02124
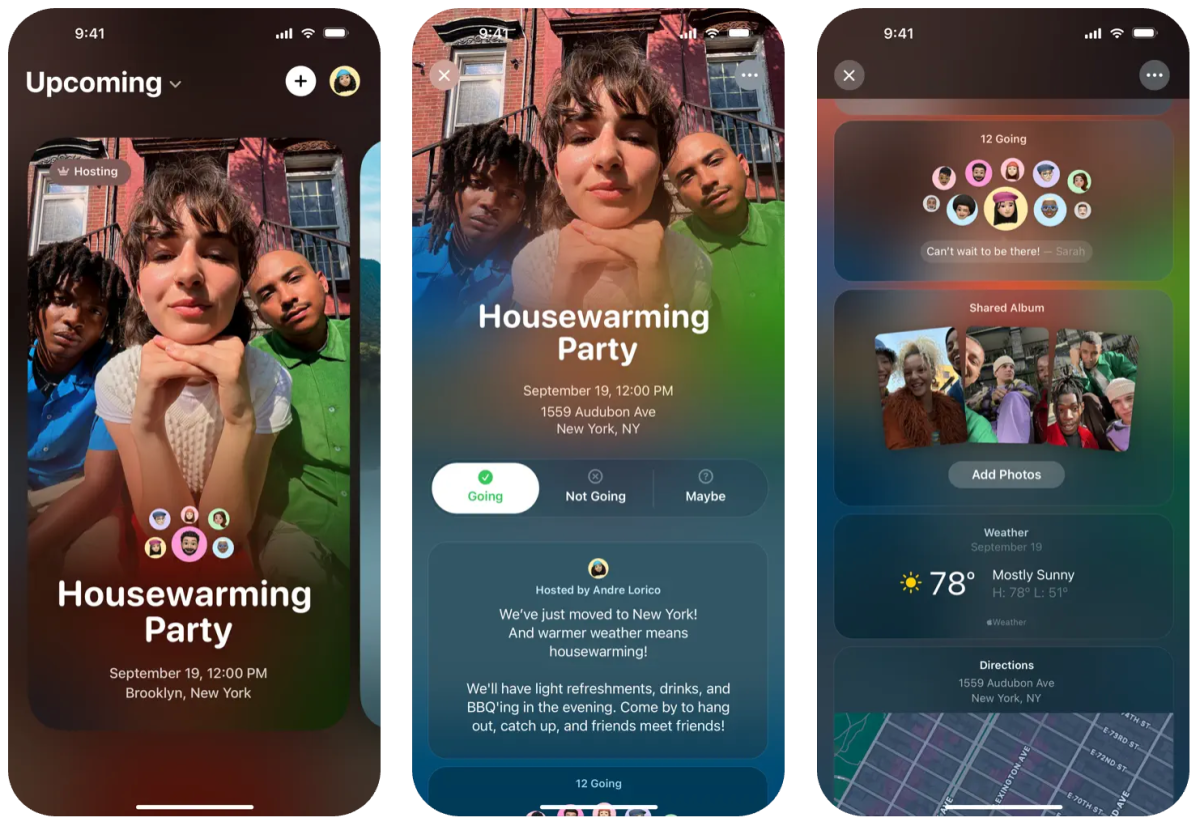
Apple has revealed a New app called invite It is designed to make it easier to create custom invitations using the iPhone or the web events. Invites are the version of Apple PartialA popular invitation application that was crown to the best app of Google Play’s 2024.
The invitations allow you to create and share invitations, to contribute to the RSVP, share albums on the events, and the soundtracks of the event courses.
To create an invitation, you need an iCloud+ subscription, which costs 99 cents per month. However, anyone who has Apple account or Apple device can do RSVP.
In this post, we will continue the process of creating an event, adding a shared album or playlist, and the process of sending your invitation to the guests.

You can create an event on your iPhone or Icloud.com using the web app on your iPhone. If you choose any route you choose, the process is basically the same.
If you are in the app you need to tap the plus sign to the upper-right corner to create an event. If you are on the web you need to select the “new event” in the upper-right corner.
From here, tap the “Add background” option, then choose the “Photo” to select an image from your library. Or, Tap the “Camera” option to take a new photo for the background. Apple also provides an selection of background to choose you.
Alternatively, you can use Apple’s image playground to create the original images for the background. You will need an iPhone that is consistent with the integrity of the image playground on invitations AppleWhich means you need An iPhone 15 Pro and aboveThe
Once you add a background image, tap “the title of the event” to enter your event name and then choose a font style.
Then, tap “Date and Time” to choose the event and end of the event. You can also choose to set it as a day’s event. After you set a date, the weather forecast will be added to the invitation of that date.
Then, tap the “location” to search for a position or tap to the proposed place. You have the option of entering a name for any location such as “Emily’s house”. When you determine a location, invitations will automatically add the information to the Apple map.
Finally, if you want, you can enter a details for the event using Apple Intelligence’s writing tools. Again, your device needs to be consistent with Apple intelligence to use the feature.
Once you create your event, you can tap the “preview” option to see what it looks before you send it to your guests.

The above steps cover the key to creating invitations for an event, Apple provides two more features that can take your invitations to the next level.
You can create a “shared album” where attendees can contribute photos and videos from an invitation. The idea behind the trait is to preserve their memories and give a way to recover the event at a later time.
To do this, you need to tap the “Create Album” option. The name of the album shared is the name of the event, but you can change it if you want.
You can also create an event soundtrack by selecting the “Add Playlist” option. Participants may then choose to add songs to the playlist before or at the event. It is noteworthy that you need an Apple Music subscription to create a shared playlist. Like a shared album, your playlist will have your event name but you can edit it.

There are two ways to invite guests to your event. You can either share the invitation as a public link or send it to specific people from your contact list.
You need to select “invited guests” to start sending invitations. If you select “Message” or “Mail” applications you can send a public link directly through those applications. If you select “Share Link” you can send guest invitations through any app on your iOS share sheet. If you tap “Copy the Link” tap you can paste the link for your invitation anywhere.
To invite any contact, tap the “guest” option, search a name, or choose someone from the list of your contacts and then share the link with them.
After you create an event and invite guests, you can share a note that everyone on the guest list can be seen. For example, if you have changed the position for the event, you can inform guests, or if the forecast calls for rain you can send a reminder to bring their umbrella.
To do this, select your event and then tap “Send a note”. Once you enter your note, tap the “Send Note” button.